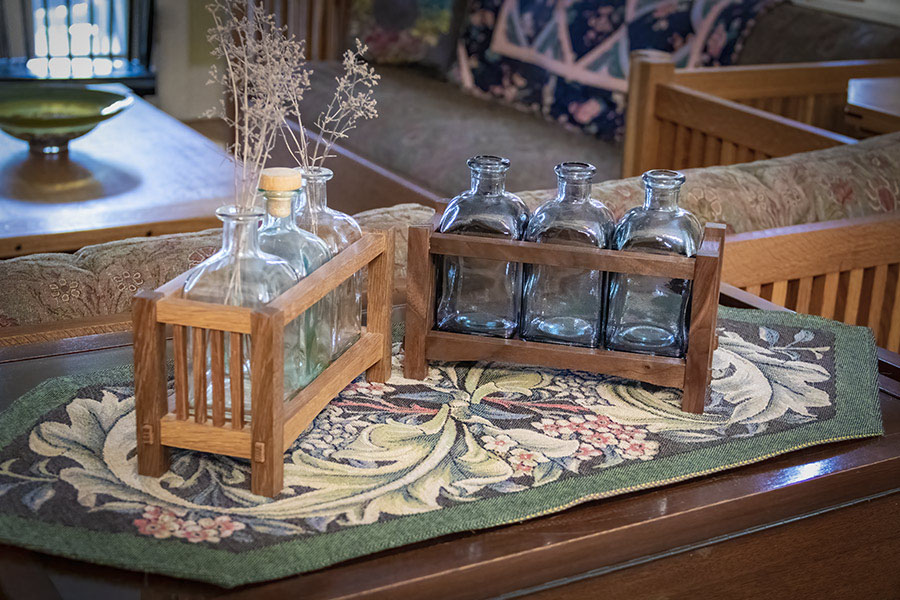
One day, my wife showed me some balsamic vinegar bottles and asked if I could make an attractive display stand for them. We already had two bottles to use, but my mind wanders when it comes to design, and I decided three bottles would create a pleasant balance. I went to my Stickley furniture books looking for inspiration and found the Stickley Footrest #395. That was it! By scaling it down and removing the seat cushion, I felt the framework was there to create a nice display caddy for the bottles.
Once I had finished the project, I not only ended up with a unique piece of decor, but had a delightful woodworking experience as well. Normally when I make a piece of Arts & Crafts furniture, I’m dealing with heavy items to lug around, and a lot of time is needed for all of the wood to be milled, cut, and shaped. This piece, however, was small, light, and went together across two days of easy (but exacting) work. The caddy is composed entirely of mortise and tenon joints along with one pair of tongue and groove joints that support the bottom. This project teaches the maker to use a variety of tricks to improve efficiency and help you achieve success on future projects. In addition, you will use less than one board foot to make this delightful item, so wood waste is not a concern.
In my original piece I used quarter-sawn white oak, and in this article I’ll use mahogany. Any dark wood would be an excellent choice. The good news is that you probably already have all the wood you need right in your scrap pile.
Tip: Because of the small size of this project, you’ll need to make a jig to handle the wood at the router table. You can either put your fingers close to the dangerous blades, or you can let your jig take the risk. It shouldn’t be a hard decision.
Download the Stickley Style Bottle Caddy Plans
Mill Your Initial Pieces
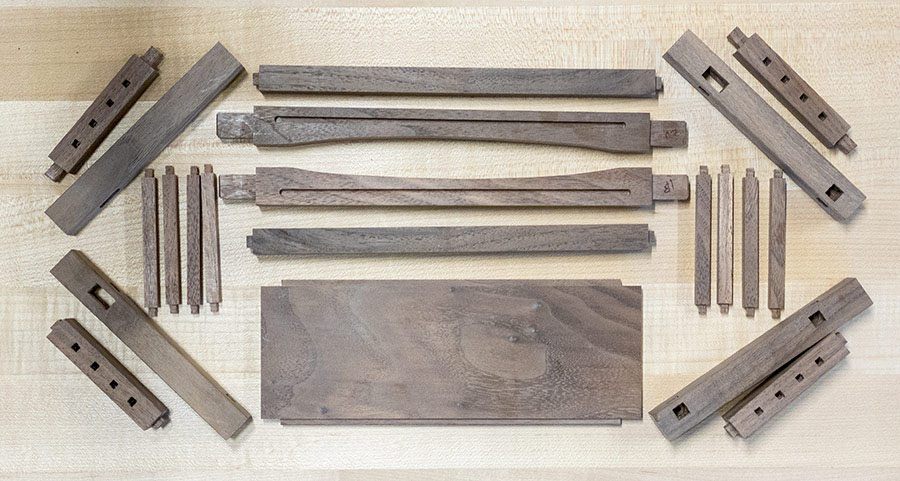
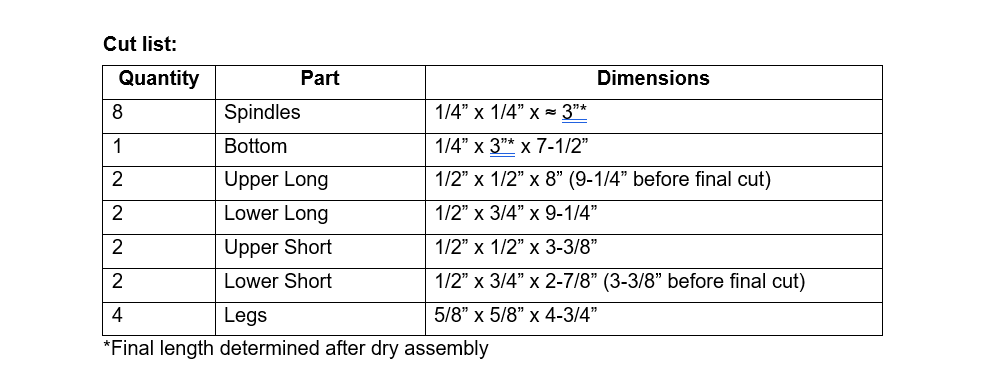
There are three different part thicknesses (1/4”, 1/2”, and 5/8”) in this project. See the cut list at the bottom of the page for full dimensions. As you prepare the boards, make extra test pieces that can be used to verify and set your tenon cutting before you cut into the pieces you plan to use. As you mill the pieces, it’s not completely critical that the thickness is perfect. Get as close as you can, but don’t go crazy trying to get it exactly right. What is critical is that pieces of like size are the exact same dimension. Having a mix of even slightly inconsistent dimensions will create problems, especially on a small-scale project like this one. Variations in smaller projects can be seen more readily than in large projects like furniture. As always, what is essential is consistency.
I like to do my final dimensioning with my planer, cutting my parts for the same size at the same time. If I have items that have a square profile, I rotate the pieces as they go through the planer so that each piece is the same in both width and thickness. Make sure your pieces are milled at right angles in the cross section. That’s essential.
Tip: Check out this video on planing square pieces to dimension.
Cut the Leg Mortises First
It’s always easier to cut tenons to fit mortises than the other way around. Once you have your legs cut to size, it’s time to do the mortises.
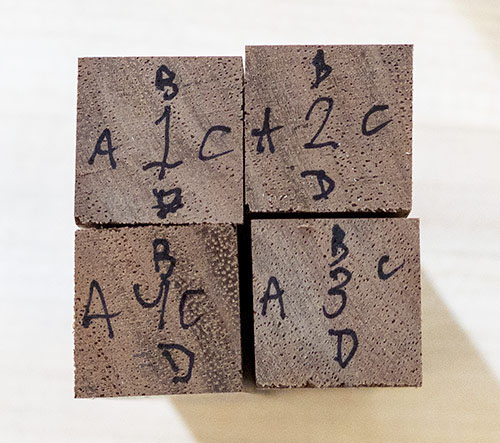 Before cutting any mortises, determine which directions the four legs will face. Lay them out and look for grain lines, complementary faces or edges, and whatever else you think looks best. Once you have all four legs in the order you prefer, number the bottom of each leg going clockwise from top left. Then, mark letters A, B, C, and D, also clockwise around each piece as shown here. These will correspond to the letters and guides found on page three of the PDF instructions. If you do not follow this instruction, it may get ugly, and the mortises won’t be correctly located.
All mortises should be 5/16” – 3/8” deep using a 1/4” mortise chisel or drill bit.
Because the legs are short in length, you may need to place a 3/8” strip of wood across the gap in the middle of your mortiser’s fence to provide continuous support. I used double-sided tape to hold the wood in place against the fence. If you do not have a mortiser, you can use a drill press and drill 1/4” holes that later will be squared up with chisels. Whatever you use, all cuts are in the same order and process.
Tip: I suggest using brad point drill bits to achieve a clean mortise. These bits do not tend to wander, and the center barb can be lined up much more accurately than a standard drill tip.
Since I’m demonstrating with both a mortiser and a drill press, you may notice photos with twice as many parts as one would actually need when making this bottle caddy. It doesn’t take much extra time to make two sets of pieces at once, so you might consider making multiples to give to others who may enjoy this project.
Adding stops to your mortiser or drill press will speed up the process considerably. That way you can set up for one hole, and any similar holes that need to be cut are easily placed in the same location.
Cutting the mortises in the legs is the one part of this whole project that demands organization. Each of the four legs are cut differently with mortises on three of the four sides for a total of five mortises (20 in all). The good news is that there are only four set-ups for the 20 mortises, so once your stops are in place, the process is relatively fast and efficient. Note that each set-up is grouped on page three of the PDF into the green group, the red group, and the blue group.
Please look at page three of the construction PDF as it shows what is done to each leg, in what order, and on what side. This should be followed from top to bottom and left to right. At the very top is a reminder of the location of each leg (identified by the number and letter that you marked on the bottom of each leg. These ends should face the text that says “Bottom of leg” as shown here.
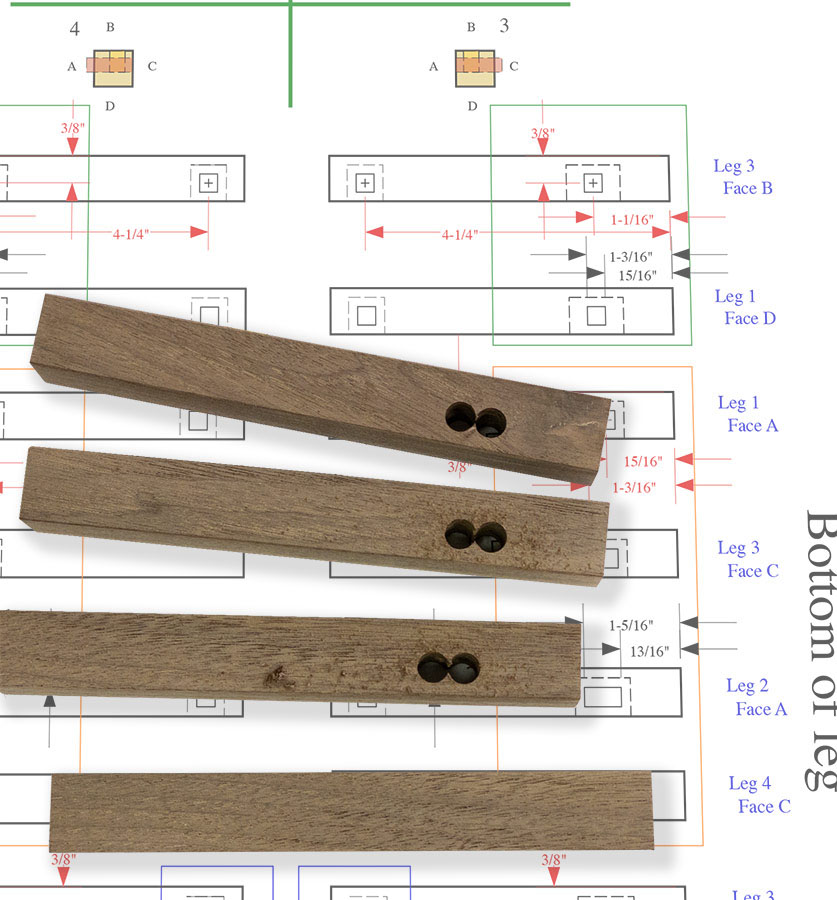 Tip: Placing your legs on the printout in the correct position and order with the drilling side up is very helpful to prevent you from cutting the wrong hole at the wrong time.
As stated earlier, consistency is more important than accuracy. If you look at the plans, each leg is 5/8” x 5/8”. All stretchers are 1/2” thick. To create a 1/8” reveal between the legs and rails, shift the mortise hole 1/16” to the side so that the stretchers are flush against the inside of the leg and the reveal is on the outside. As long as that is consistent on all legs, once you set your fence position, the fence will never be moved for the rest of the project. When you need to drill from the other side of the leg for the through mortises (to prevent tear-out), flip the leg left over right and place it against the stop on the other side. Do not roll it over to cut the other side of the through mortise.
Please note that you will need both a 1/8” and a 1/4” spacer. Set-up blocks like these or these are great, but wood spacers will work just as well. The following steps show the procedure for what to set up as you move from the green group through the red group. You can also see a drawn version of the following section on page four of the PDF that shows this with illustrations.
 Starting with the green steps, place the 1/8” spacer between the stop and the bottom of the leg. Now drill the second green step.
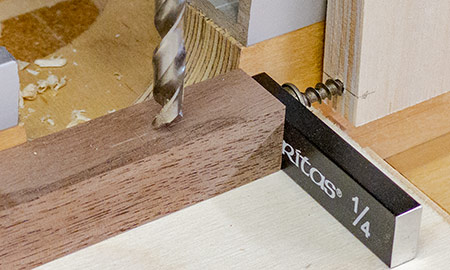 Proceed to the red steps by placing the 1/4” spacer in position and rotate the leg to the appropriate face. Then, drill the first hole of the through mortise into the proper face.
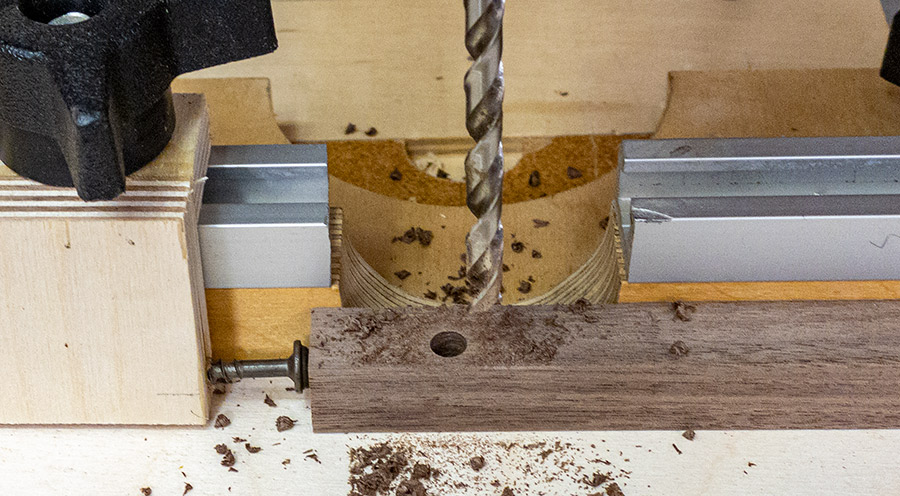 Remove the 1/4” spacer and drill the second hole for the through mortise. Continue with the other three red mortises by inserting the spacer, drilling, then removing the spacer and drilling again.
 Finally, reset the stop for the last set of mortises at the top of the leg. Note: On my mortiser, there is a hole in the base to prevent mashing the tip of the mortise into the base. You need to cover this hole or the leg will tip into it as you drill. I used a wide metal ruler so that I could drill without issue.
Now, follow the guidelines on page three to set your stop on the other side, flip the legs over, and do the next 10 mortises as shown above.
Whether you use a mortiser or drill press, you will need to use 1/4” and 1/2” chisels to clean up the mortises and/or make the round holes square.
Prepare the Short Stretchers First
Before working with the short stretchers, be sure to verify which are edges and which are faces of the wood, especially with the 1/2” square upper stretchers.
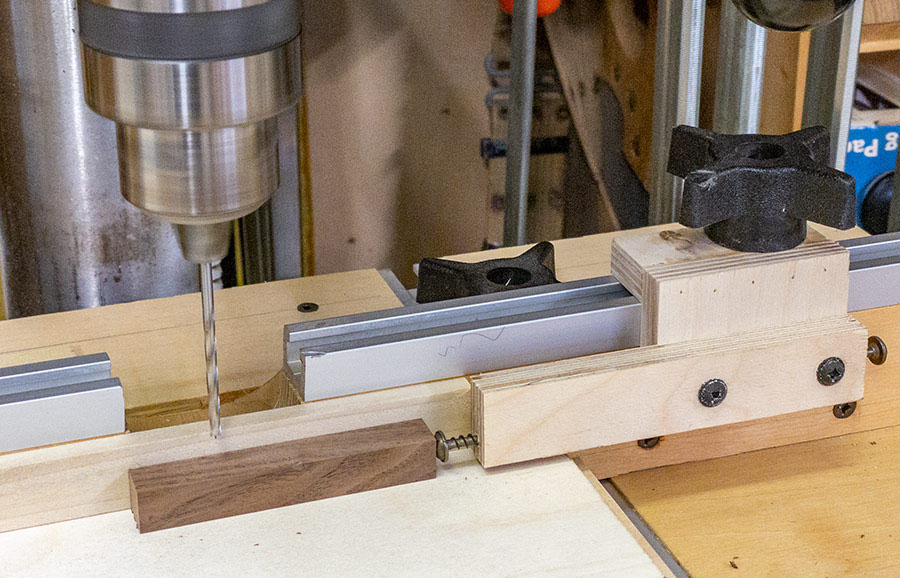
Drill the four 1/8” holes to receive the spindles. The holes should be 1/4” deep. The spindle mortises are located 1/2” apart. Complete dimensions for drilling these holes are provided on page two of the instruction PDF.
On your drill press, set the fence so that you’re drilling the 1/8” holes in the center of the 1/2” stretchers. Test the fence position with a scrap piece: drill a tiny bit, flip the piece so that the side that was facing you is now against the fence, and check to see how close to the middle you are. If you think you can improve it, make the necessary adjustments before you start drilling.
Now, set your first stop and drill the first hole. If you’re comfortable that the hole is centered in the middle of the piece, rotate the stretcher left to right and drill the last hole on each piece. Drill these same two holes in the three other short stretchers. Then, reset your stop and drill the third hole, and flip the piece around to drill the fourth hole. Do this to the rest of the short stretchers.
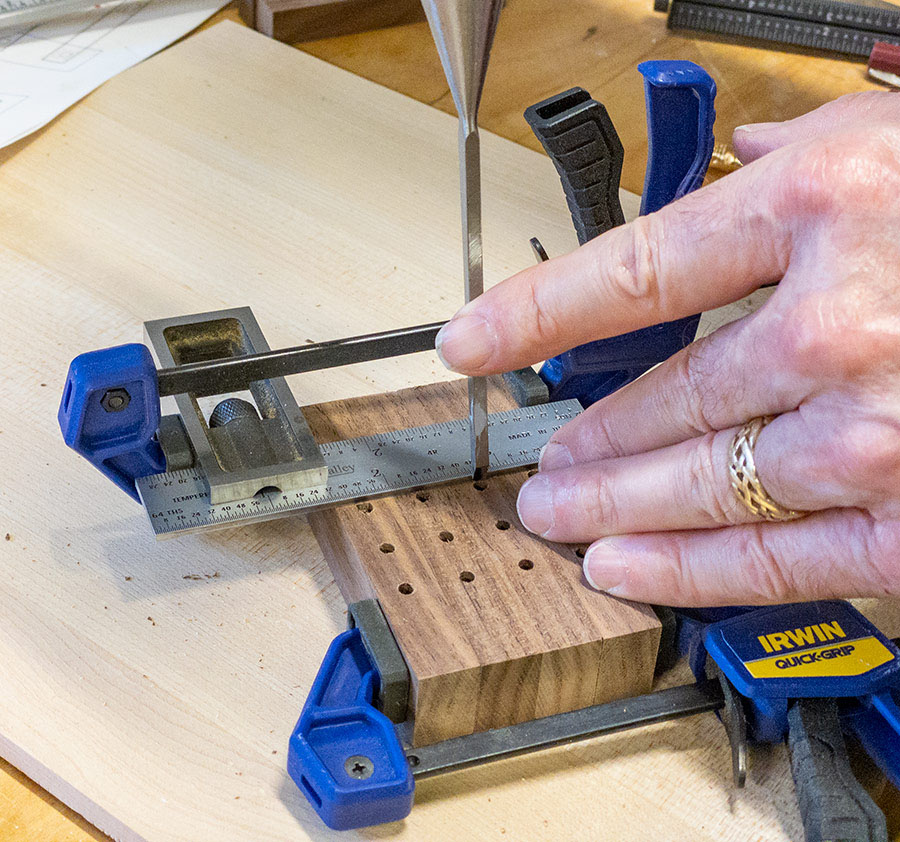 Once the holes are drilled, it’s time to make them square with a 1/8” chisel. I like to clamp them all together with small finger clamps. This way I can place a double square or small combination square against them so that it’s easier to align the chisel against the square. As I mentioned earlier, you’ll see four of these upper stretchers because I’m making two of the bottle caddies at the same time.
Tip: If you’ve never cut mortises with a chisel, do not place your chisel edge directly on the line and whack it with a hammer. Remember that the chisel is a wedge, and as the wedge goes down, it will push the other side away causing the hole size to increase. Instead, have the chisel edge placed slightly away from the line or square and work your way toward the line or square. Easy does it. Do not hurry.
Cut the Tenon Shoulders on Upper and Lower Stretchers
For small tenons, I prefer to cut the cheeks on the router table, and for larger (furniture size) tenons, I prefer using a tenoning jig on my table saw. For shoulders, regardless of size, I prefer cutting them on my table saw because it provides me with the cleanest shoulders.
Note that the cut list dimensions include the tenons. By cutting all tenons the same way, it’s much easier to make the body of the piece (everything that’s not a tenon) the same length. Having half of the tenons short is necessary because this caddy is small, and when you have two tenons meeting at right angles in the leg, there just isn’t that much room.
Because of that, this design gives one of these two tenons right of way and the other is cut short. The lower long stretchers have long tenons while the upper long stretchers have short tenons. The same approach is taken with the short stretchers. If you did something like this for a chair or table, you’d be asking for a major disaster. However, since this is a small display piece, these delicate joints are perfectly acceptable.
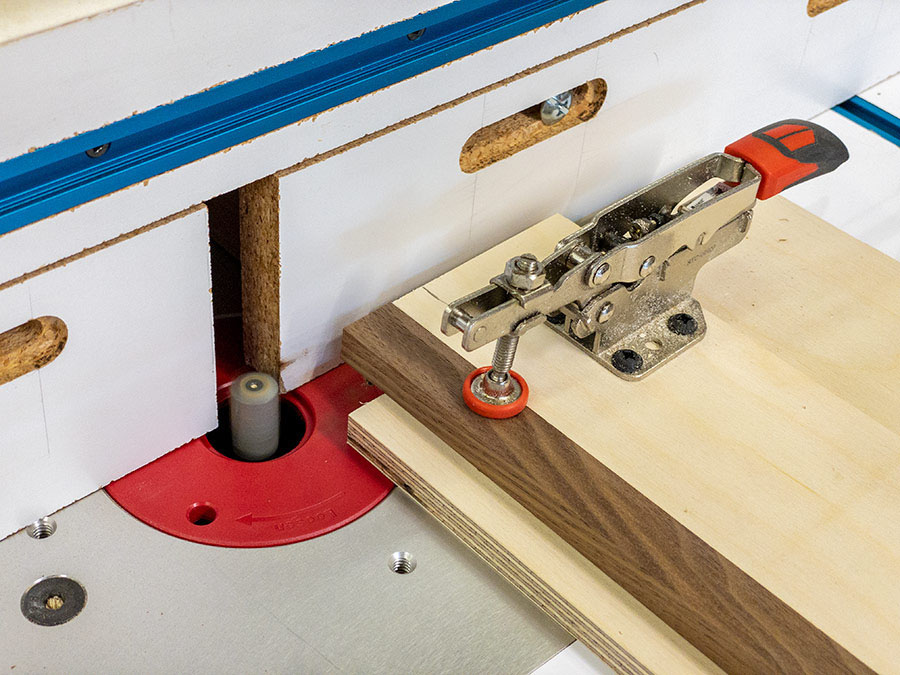
The upper and lower short stretcher and the upper long stretcher have the same cross section (square profile). The lower short and long stretchers are taller than they are wide (rectangular profile). Take one of the square profile test pieces to verify the amount you’ll need to remove from the tenons to fit your mortises. Also, take one of the rectangular test pieces to test for the lower short stretchers (but this can be done later).
To safely hold the side pieces to cut the tenons, I like to use a simple jig. The jig is made of 1/2” plywood (8” x 3”) glued on top of a wider piece of 1/2” plywood (8” x 8”) and 1-1/4” from one side. Since plywood is thinner than 1/2”, there’s plenty of room to pinch down on the wood and not make contact with the plywood. The only thing that’s important here is that the top piece of plywood is perpendicular to the router table’s fence. Auto-adjust clamps work great for this application but regular hold-down clamps work well, too.
Although you’re not cutting the shoulders yet, you do need to verify the amount of wood to remove for the cheeks. Make test cuts in your scrap pieces to establish the correct height of the router bit. You’ll need to cut all the way around the side pieces but do not need to go to the full tenon length as you’re only determining the height of the bit.
For all long stretchers and the top short stretcher, you’ll need to cut 1/8” all the way around the stretcher (pending final test measurement). For the bottom short stretcher you will cut 1/8” off the sides but 1/4” off the top and bottom.
Remember, it’s always easier to remove wood than to add wood. Dial in your final dimensions slowly to get the proper tenon thickness.
Tip: Check out this video for info on cutting tenons on a router table.
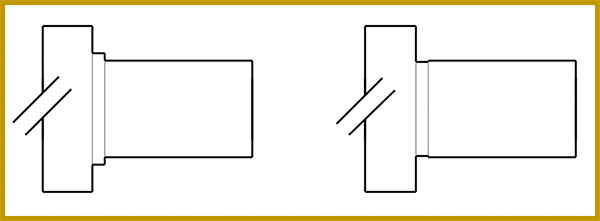
As I mentioned, to get the cleanest results, I like to cut all of my tenon shoulders on the table saw. To do this, I raise the blade just a tad higher (about 1/64” – 1/32” depending on the size of the tenon) than the amount I will remove for my tenon cheeks. If the blade is not tall enough, you’ll leave a step that you’ll have to remove later. If it’s just a tad taller, you’ll leave a channel that has no effect on the strength of the tenons and provides a space for glue to collect. Because you’re moving from the router table to the table saw and back to the router table, you can use your test pieces to set the height of the blade based on your stretcher’s actual dimensions.
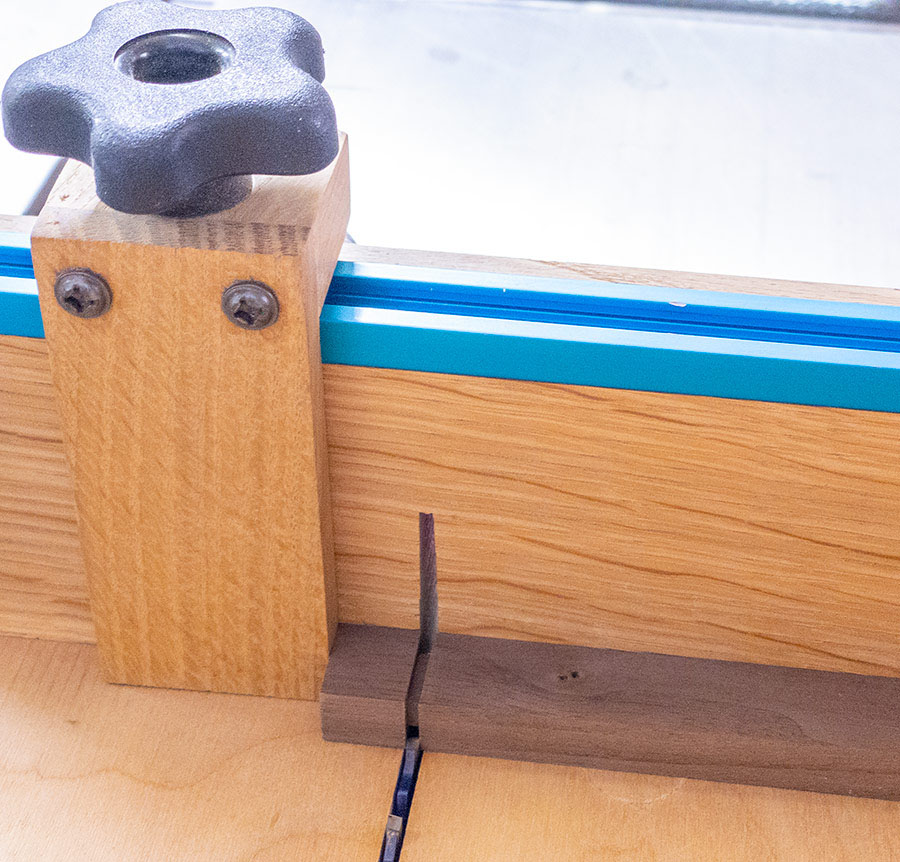 For the lower and upper long stretchers, set the stop so that you’ll be cutting 3/4” into the stretcher. Your blade height is the one determined from your test cuts into the stretcher. Cut the shoulders.
For your short stretchers, set the stop 3/8” into the wood. Cut into the stretcher around the upper short stretcher and just the sides of the lower short stretcher.
Lastly, raise the blade to 1/4” (determined by your test cuts) and cut the top and bottom of the lower short stretchers.
Cut the Cheeks on the Stretcher Tenons
Return to the jig you used earlier to test cut the cheeks. You can use your test pieces to set or reset the blade height if needed.
Depending on how wide a bit you’re using, you may need to move the fence position back to expose more of your router bit as needed to cut the rest of the cheek. The saw’s kerf, created when you were cutting the shoulders, gives you a space to help avoid cutting into the shoulders.
After cutting the cheeks on your upper stretchers, cut just the side cheeks of your lower stretchers. Then, raise the router bit to 1/4” to cut off the top and bottom cheeks of the lower short stretchers.
After the tenons on the upper long and lower short stretchers are made, cut these tenons shorter so that they are now 1/8”, and leave the tenons on the other stretchers alone.
Cut the Bottom Groove on the Lower Stretchers
On your router table, add a 1/8” wide and 3/16” deep groove along the inside of the lower long stretchers, 3/16” from the edge, 6-3/4” long, and 1-1/4” from both ends. You can do this by setting stops to start and end your cutting. Alternatively, you can place lines on the router table’s fence to let you know when to start and stop. Fortunately, this groove is hidden so if you miss a tiny bit, it won’t show.
Tip: Check out a similar process used to create a keyhole slot.
Cut the Arc on the Bottom of the Lower Stretcher
There are several ways to make the arc, or “fair curve,” on the lower long stretcher.
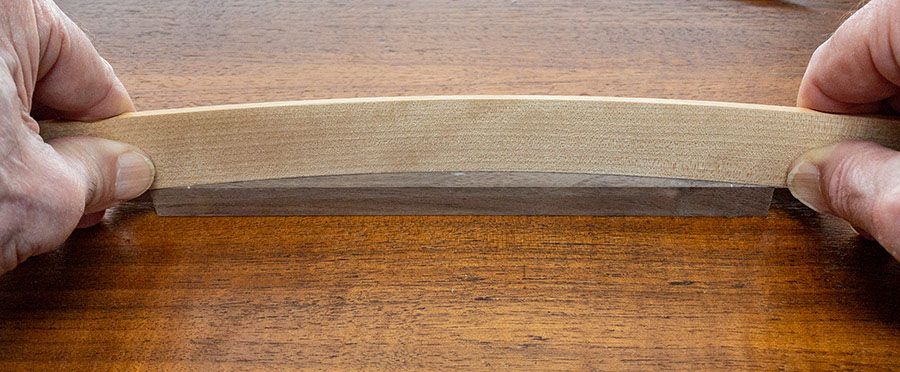
However, if you have a friend or spouse willing to spare a moment of their time, the quickest way may be to take a thin piece of wood (or semi-rigid plastic), bend it to create the arc following marks made on the wood, and ask them to draw the line for you.
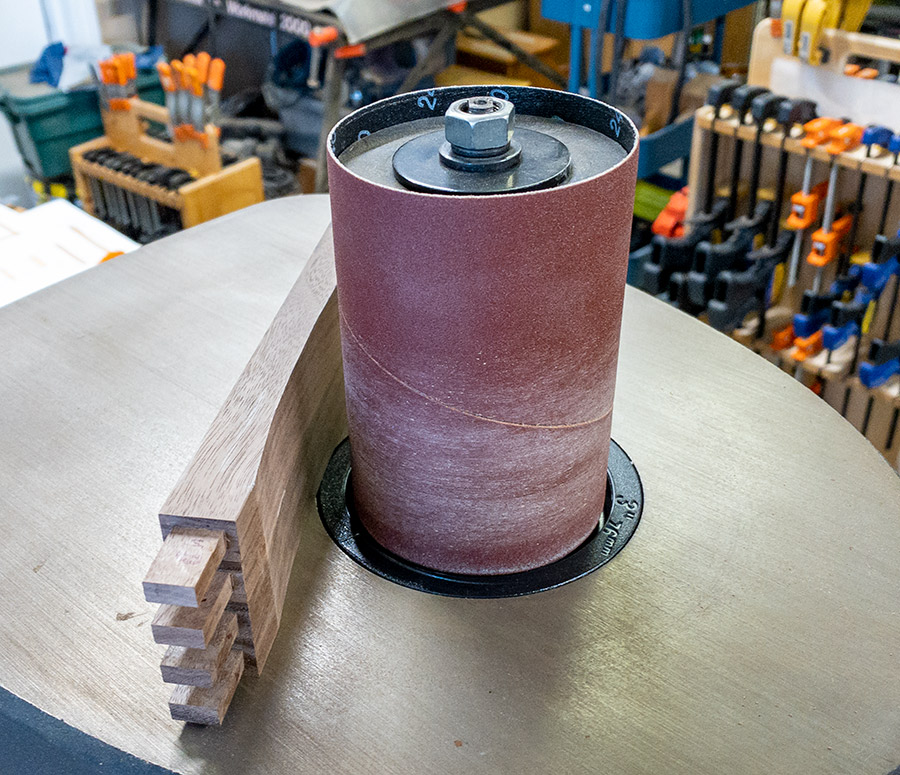 Stick the stretchers together with double-sided tape, and cut out the arc using a band saw leaving the pencil line to sand off along with the saw marks.
Find the Spindle Length and the Bottom Width
In woodworking, your build construction should always be outside-in, as you won’t have an accurate interior dimension until you’ve built the exterior. Do not cut the spindles or the bottom until you’ve verified the dimensions in the dry assembly.
First, measure the vertical distance between the short stretchers. When cutting the spindles to length, take that measurement and add 3/8” (the spindle’s tenons are 3/16” long).
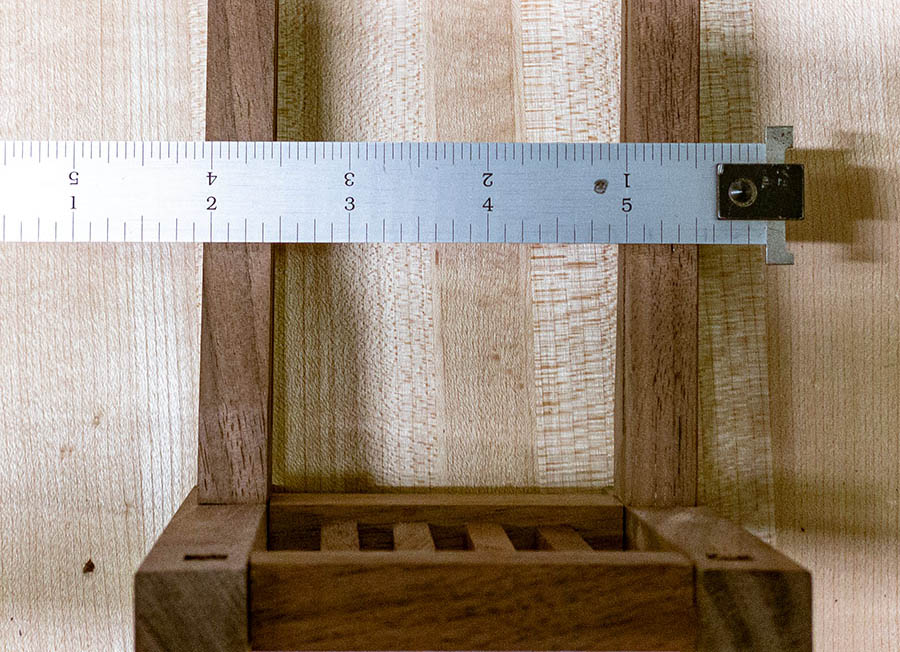
Now, measure the distance between the two lower long stretchers and add 1/4" to the dimension. If in doubt, cut them a tad wider, it’s much easier to decrease the width of the bottom than to increase the width of the short stretchers a tiny bit.
Cut the Spindle Tenons
Cutting 1/8” tenons on 1/4” wood seems like one heck of a challenge, but it’s actually quite easy. By using an ATB (Alternating Top Bevel) sawblade, you can make a ridged tenon that can squish into the mortise and provide flexibility when fitting.
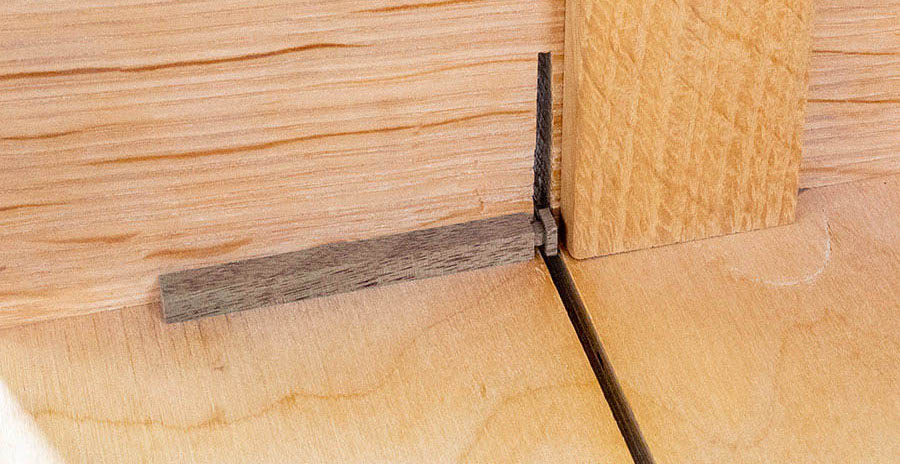
Set up a stop on your table saw sled to first cut the shoulder 3/16” into the length of one of your test spindles. If your spindles are 1/4”, the blade should be 1/16” up from the cutting surface. If your spindles are undersized or oversized you may need to accommodate the difference in size. Since this is a test cut, set your blade height slightly below 1/16” until you’ve tested it. If the tenon is loose, lower the blade, and if it’s too tight, raise the blade up a bit.
Remember, each time you raise or lower the blade, the total material removed is doubled since you’re cutting on all sides. Once you’ve cut all the way around the spindle, move the spindle away from the stop and repeat the cuts all the way around to finish the tenon.
When you push this into the upper and lower short stretchers, it will squish in easily with no glue necessary (not that spindles ever need glue).
Before you assemble the sides, be sure that you have the correct faces and edges all showing in the direction you want them. In addition, sand the pieces as necessary before assembly. This is not something that you want to assemble, take apart, and assemble again (1/8” tenons are not robust).
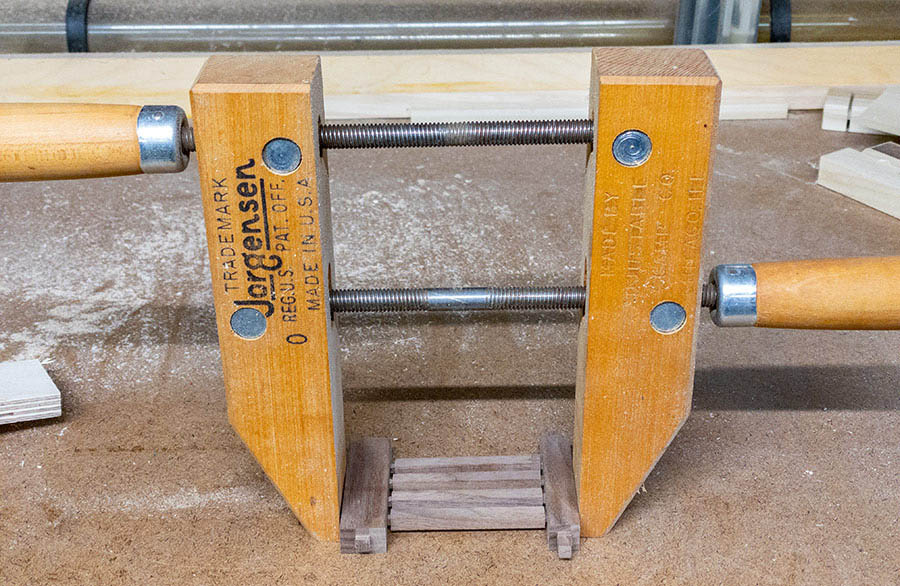
If needed, one way to get even pressure across the full stretcher is with a wood clamp. After partially squeezing them in, flip it over and squeeze from the other side to ensure it does not end up lopsided.
Prepare the Bottom
The width of the bottom is determined after the dry assembly. Cutting the tongues on this is easy. Raise the router bit to 1/16” above the surface, and slowly increase the depth of the cut until you’ve removed enough to properly fit into the groove of the lower stretchers.
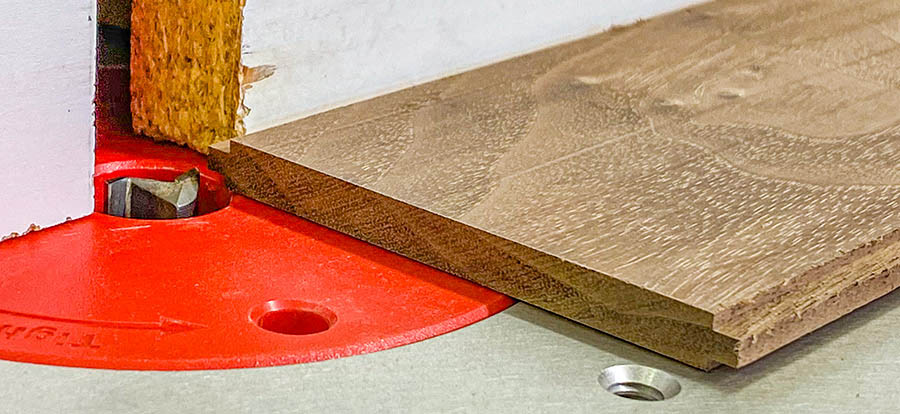
The bottom piece is shorter in length than the space it fills by 1/4”, leaving a 1/8” gap on both ends. Also, the groove on the lower long stretchers is shorter than the bottom piece’s tongue to create a blind dado. This means you’ll have to cut off a portion of the tongue on all four corners.
Tip: As you cut these corners down and remove waste with a chisel, be slow and careful. Take small saw cuts using the ledge to guide the chisel, and always cut toward the center of the board’s thickness to avoid cutting the surface of the ledge.
Final Assembly
If you haven’t pre-sanded the parts yet, now’s the time to do so.
Since you’ve already done a dry assembly, you may have gone through the pain points, the biggest one being that 1/8” tenons are not much to work with and don’t really want to stay put. Fortunately, each side has a long and a short tenon, so it ends up working out.
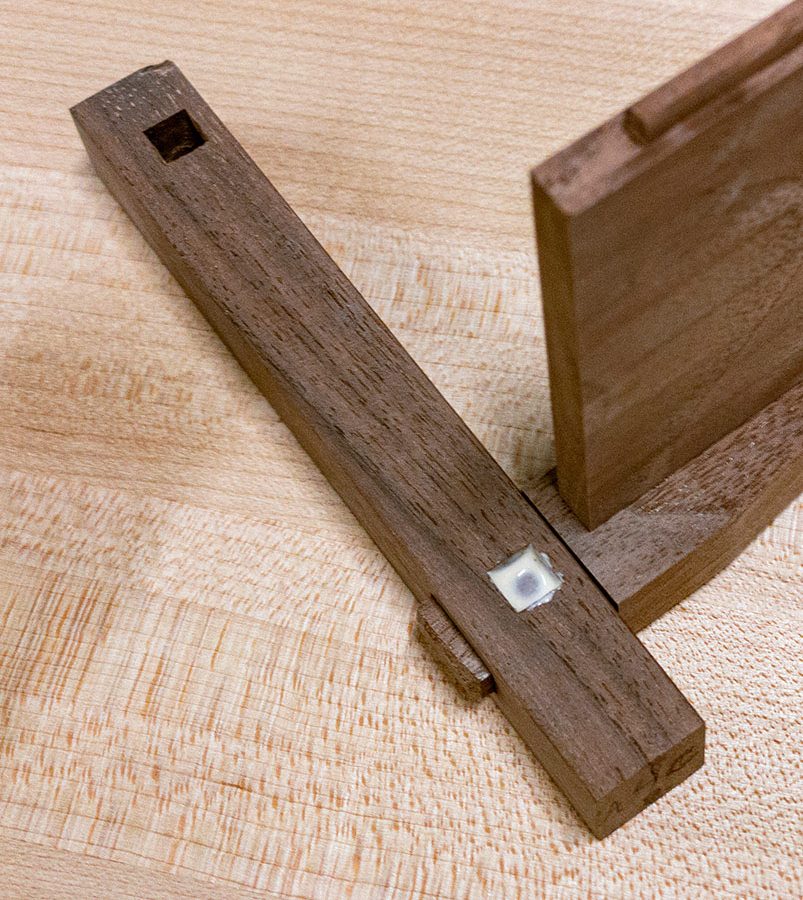 Normally, a through tenon is a challenge when it comes to gluing. How do you prevent glue from squeezing out all over the tip and jeopardizing the quality of the finish?
There are ways to deal with this when making full-sized furniture, but something this small does limit your options. However, because no one will be sitting on your bottle caddy, there is a trick to gluing these through tenons that works.
At right angles of the through tenons is another mortise. If you put glue in the mortise and slide the tenon back and forth a bit to smear the glue around, a sufficient amount of glue will be distributed, and the joint will be fine. Then, put the receiving tenon in this mortise and continue assembling the caddy. (Please do not try this trick with furniture as it does not make a strong joint.)
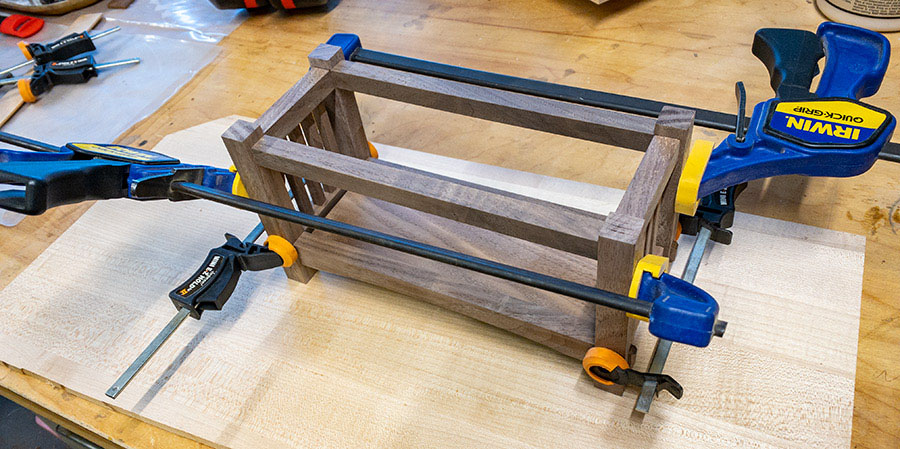
Before the glue begins to dry and harden, place your bottle caddy upright on a flat surface for clamping. Try to use the lightest clamps you have; heavy clamps and/or too much pressure may cause distortion.
If you want to be extra cautious, after everything is glued and clamped together but not quite dry, place something flat and heavy on top of your bottle caddy to make sure it’s stable as you wait for the glue to set.
If you notice any glue squeezing out, wait for it to become rubbery and trim it off with a chisel.
Finishing
You can finish your bottle caddy just about any way you prefer: lacquer, shellac, oil finishes, brush, spray, rag, or however you think looks best! Once you’ve decided how to put the finishing touches on your project, it’s ready for its maiden voyage in the kitchen. This quaint caddy can be loaded up with anything you choose including olive oil, vinegar, spices, or utensils.
Tip: Giving this project as a gift? Personalize your finished piece with a hidden message on the underside of the caddy, or add a simple monogram to the top or bottom stretcher.
Download the Stickley Style Bottle Caddy Plans
Material Sources:


I think this would be beautiful for Christmas gifts